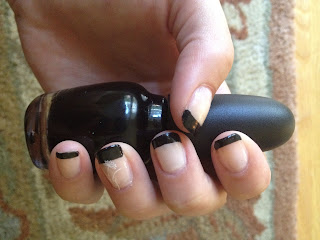
Here is a another simple manicure! I used "Lacey Lilac" by Sally Hansen for the base color and Recollection's sparkles. I used tape in order to make the lines. It chipped pretty fast unfortunately, but it was pretty while it lasted! Here are some more pics...
Notorious Nails!
Follow for new and fun nail ideas (:
Saturday, July 7, 2012
Sunday, July 1, 2012
"Lacey Lilac" and "Brooke"
This is a really simple manicure cause I'm kinda busy right now. It's two coats of "Lacey Lilac" by Sally Hansen Hard as Nails, and one coat of "Brooke" by Julep as a shimmer top coat. The "Lacey Lilac" color is a creme finish, while "Brooke" has a jelly finish. It was a really thick manicure, and once it tried it looked really good because of it. Here are a few more pics!
Friday, June 29, 2012
Watercolor Nails
These are absolutely some of my favorite nails. They are so incredibly easy to do and they look really cool (: Just paint your nails whatever base color you want, mine is "White On" by Sally Hansen Hard as Nails, and then put dots of colors in the corner (one color at a time). Take a tooth pick and pull it through the dot a few times. That's all! Add a top coat and Viola!
The colors used for my dots are:
"Fushia Power" by Sally Hansen Hard as Nails
"Blue for you" by Sally Hansen Hard as Nails
Black Tip French!
Well unfortunately I had to attend a funeral the other day, and I figured that wearing bright purple nails wouldn't be such a great idea. These are what I cam up with! They're simple and elegant (: The black is "What's a Jack?" by OPI and the base color is "Snowflake Pink" by Revlon. I stamped the flower on with "White On" by Sally Hansen Hard as Nails. Here are more pics:
Help to Stop Biting Your Nails!
I know it's hard. I literally got over the habit a few months ago (I peeled them not bit them, but same concept)! Here are some tips on how to make this process easier. The first one is the most important in my opinion...
- Paint your nails! If you have an awesome design on your nails, it's much harder to destroy it! Plus, who likes the taste of nail polish - yuck!
- Dip your fingers in nail polish remover in the morning (non-acetone), the taste will help deter your fingers from getting near your mouth.
- Think. Think of everywhere your hands have been that day - door knobs, chairs, kitchen counters, trays, etc... Do you really want all of those things to be in your mouth?
- Finally, wear a rubber band. Every time you bite or peel your nails, snap it! Soon you'll associate biting/peeling your nails with a stinging pain.
Hope this helps! If you're still really having trouble, I can give you some more tips!
Monday, June 25, 2012
Scentsational Mango!
Here's a picture of the orange I used under it, Marmalade by Revlon. I used two coats of "Marmalade" and one coat of the Mango.
More pictures of the finished product!:
Friday, June 22, 2012
Nails on a Budget
If you're always seeing these blogs where the girls all have every tool they could ever need and wonder how they can buy it all, you're not alone! Here are a few things that I have found can be switched for their more expensive doppelganger!
Cutitcle Oil --> Olive oil
Nail Polish Thinner --> Nail polish remover
Bad Tasting Nail Polish (for nail biters) --> Nail polish remover
Dotting Tool --> Pencil (the sharper the tip, the smaller the dot)
Pedicure for removing calluses --> Ped Egg (I love this thing so much)
Nail Art Colors --> One thin paint brush (make any color a nail art color)
Subscribe to:
Posts (Atom)


